2011年1月15日土曜日

Android:JSON表示クライアントアプリ

こないだGoogle App Engine + slim3 + JSONICで作ったサンプルをAndroidで表示するアプリを作ってみたのでメモ。

とりあえず実現したい事は、JSONをHTTPのgetで受け取ってListViewで表示までを目標に。
で、下記のように実装。
(URIベタ書きですが...、とりあえず動かしたいので。)

import java.io.IOException;
import java.util.ArrayList;
import java.util.List;
import org.apache.http.HttpEntity;
import org.apache.http.HttpResponse;
import org.apache.http.HttpStatus;
import org.apache.http.ParseException;
import org.apache.http.client.ClientProtocolException;
import org.apache.http.client.methods.HttpGet;
import org.apache.http.impl.client.DefaultHttpClient;
import org.apache.http.params.HttpConnectionParams;
import org.apache.http.params.HttpParams;
import org.apache.http.util.EntityUtils;
import org.json.JSONArray;
import org.json.JSONException;
import org.json.JSONObject;
import android.app.Activity;
import android.os.Bundle;
import android.widget.ArrayAdapter;
import android.widget.ListView;

public class JsonListActivity extends Activity {

 private String strUri = "http://1.latest.slim3demo001.appspot.com/AjaxTweet.json";

 private String json = null;

    /** Called when the activity is first created. */
    @Override
    public void onCreate(Bundle savedInstanceState) {
        super.onCreate(savedInstanceState);
        setContentView(R.layout.main);

        DefaultHttpClient httpClient = new DefaultHttpClient();
        HttpParams params = httpClient.getParams();
        HttpConnectionParams.setConnectionTimeout(params, 1000);
        HttpConnectionParams.setSoTimeout(params, 1000);
        HttpGet httpRequest = new HttpGet(strUri);
        HttpResponse httpResponse = null;

        try {
   httpResponse = httpClient.execute(httpRequest);
  } catch (ClientProtocolException e) {
   e.printStackTrace();
  } catch (IOException e) {
   e.printStackTrace();
  }
  if (httpResponse != null && httpResponse.getStatusLine().getStatusCode() == HttpStatus.SC_OK) {
   HttpEntity httpEntity = httpResponse.getEntity();

   try {
    json = EntityUtils.toString(httpEntity);
   } catch (ParseException e) {
    e.printStackTrace();
   } catch (IOException e) {
    e.printStackTrace();
   } finally {
    try {
     httpEntity.consumeContent();
    } catch (IOException e) {
     e.printStackTrace();
    }
   }
  }

  httpClient.getConnectionManager().shutdown();
  ArrayAdapter adapter = new ArrayAdapter(this, android.R.layout.simple_list_item_1);

  try {
   JSONArray jsonArray = new JSONArray(json);
   int cnt = jsonArray.length();
   List jlist = new ArrayList();
   for (int i = 0; i < cnt; i++) {
    jlist.add(jsonArray.getJSONObject(i));
   }
   for (JSONObject obj : jlist) {
    String item = obj.getString("content");
    adapter.add(item);
   }
  } catch (JSONException e) {
   e.printStackTrace();
  }
  ListView listView = (ListView)findViewById(R.id.jsonlistview);
  listView.setAdapter(adapter);
    }
}
main.xmlは下記のように
<?xml version="1.0" encoding="utf-8"?>
<LinearLayout xmlns:android="http://schemas.android.com/apk/res/android"
    android:orientation="vertical"
    android:layout_width="fill_parent"
    android:layout_height="fill_parent"
    >
    <ListView
     android:id="@+id/jsonlistview"
     android:layout_width="fill_parent"
     android:layout_height="wrap_content"/>
</LinearLayout>
ネットにつなげるので、Manifestファイルにも"android.permission.INTERNET"を追加
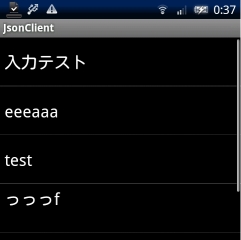
<uses-permission android:name="android.permission.INTERNET"/>
一応無事に動きました。
参考サイト: Android で JSON を使おう ~ 前編~CommentsAdd Star Android で JSON を使おう ~ 後編 ~CommentsAdd Star

2011年1月12日水曜日

Androidメモ:Android で証明書が期限切れ

久しぶりに以前作ったサンプルプログラムを参考にしようとEclipseでプロジェクトを開いたら、
「Error generating final archive: Debug Certificate expired ...」
とか言われてビルドできませんでした。

検索してみると、Android SDK の debug 用キーストアの有効期限がすぎているみたい。

C:\Documents and Settings\USER_NAME\.android以下のdebug.keystoreを削除したら正常にビルドしてくれました。

参考サイト:Android で証明書が期限切れというエラーがでて apk が作成できない

2011年1月7日金曜日

JavaのList内容をソートする

セッションに貯めたレコードのリストをソートする必要があったのでメモ

 /**
  * Listソート処理(Key昇順)
  * @param list
  */
 public void sortKeyAsc(List<DataModel> list) {
  Collections.sort(list, new Comparator<DataModel>() {
   public int compare(DataModel t1, DataModel t2) {
    // Key昇順
    return t1.getKey().compareTo(t2.getKey());
   }
  });
 }
降順はreturnしてる箇所を下記のように逆にする。
  return t2.getKey().compareTo(t1.getKey());

2011年1月6日木曜日

slim3 + JSONICメモ


slim3のtutorialをJSONICを使ってajaxでTweetするようにと、RESTfulに変えてみたのでメモ
できたのはこんなかんじ


JSONICの使い方メモ

準備

 最新のjsonic.jarをダウンロードしてプロジェクトに配置・ライブラリに追加

※追記 2011/02/01 jsonic.jarの配置場所が、war/WEB-INF/lib以下に置かないとローカルで動きませんでした。

エンコード・デコード

 JSON.decode(String json, XXX.class)でjson→javaオブジェクト
 JSON.encode(XXX)でjavaオブジェクト→json

WebサービスAPIを使う

RESTサーブレットを使用する場合

web.xmlへ追加


     restServlet
     net.arnx.jsonic.web.RESTServlet
     
      config{
       "mappings":{
        "/{class}.json":"tutorial.controller.twitter.${class}Controller"
       }
      }
      
    
    ・
    ・
    ・
    
     restServlet
     *.json
    

コントローラは下記のように実装。

RESTfullな操作はJSONICのRESTサーブレットがやってくれるので、

HTTP MethodのGETでfind()メソッド、POSTでcreate()メソッドを呼出すように実装します。


import java.util.List;

import tutorial.model.Tweet;
import tutorial.service.TwitterService;

public class AjaxTweetController {

    private TwitterService service;

    public List find() {

        this.service = new TwitterService();

        List tweetList = service.getTweetList();

        return tweetList;
    }

    public void create(Tweet tweet) {

        this.service = new TwitterService();

        this.service.tweet(tweet);
    }
}

TwitterServiceにメソッド追加

/**
     * JSON形式でもらってDataStoreへ追加
     * @param jsonTweet
     * @return String
     */
    public String jsonTweet(String jsonTweet) {

        Tweet tweet = JSON.decode(jsonTweet, Tweet.class);
        tweet = this.tweet(tweet);
        String retJsonTweet = JSON.encode(tweet);
        return retJsonTweet;
    }

viewは下記

<p>What are you doing?</p>
<form id="tweetForm" action="tweet" method="post" name="tweetForm">
<textarea id="content" name="content"></textarea><br/>
<input type="button" value="tweet" onclick="sendTweetJSON()"/>
</form>

<div id="ajaxTweetList"></div>

</body>
<script type="text/javascript">

function sendTweetJSON() {
 var form = $("#tweetForm");
 var param = {};
 $(form.serializeArray()).each(function(i,v){
  param[v.name] = v.value;
 });
 var jsonval = $.toJSON(param);

 $.ajax({
  type:"POST",
  url:"/AjaxTweet.json",
  contentType:"application/json",
  data:jsonval,
  cache:false,
  success:function(data){getAjaxList();}
  });
}

function displayList(jsonData) {
 var list = jsonData;
 var resultData = "<table><tr><th>TweetList</th></tr>";

 for (var i in list) {
  var content = list[i].content;
  resultData += "<tr><td>" + content + "</td></tr>";
 }
 resultData += "</table>";
 return resultData;
}

function getAjaxList() {
 var list;
 $.get("/AjaxTweet.json", function(data){
  $('#ajaxTweetList').html(displayList(data));
 });
}

$(function() {
 getAjaxList();
});
</script>

jqueryを使用しているのでheadでライブラリを読込み

<script type="text/javascript" src="/js/jquery-1.4.2.min.js"></script>
<script type="text/javascript" src="/js/jquery.json-2.2.min.js"></script>
<script type="text/javascript" src="/js/deserialize.js"></script>


参考サイト:
jQueryでフォームの内容をJSONで投げ、受け取ったJSONをフォームに戻す方法

JSONIC